
Key Takeaways
Figma to Framer is not a one-click website conversion.
Clean your Figma file before importing to reduce layout issues.
Import section by section for better control.
Rebuild key components like buttons, cards, navbars, and FAQs.
Figma is the place where the design ideas for websites take place, and Framer is where those ideas become live, responsive and interactive. Designers, founders, agencies, no code builders sometimes face a blocker when moving from a static Figma design to a published Framer site without losing quality.
Many beginners in this field mistake the process as a copy paste migration workflow. Knowing the Figma to Framer workflow will help you launch faster, have strong design control and reduce the need of the traditional development handoff.
You must know that importing the design from Figma is the first step. After that you have to do things like layout cleanup, responsive settings, interactions, SEO, performance check, and testing.
What Is Figma to Framer?
Figma to Framer is the workflow process of moving a website design from Figma to Framer so it can be a live and launched website. Figma is used to design interfaces, explore visual ideas, create design systems, collaborate with teams and clients before the development work. Figma gives the designers a flexible space to plan and experiment the structure, layout, content flow, and visual direction of a website.
Framer is made for turning those ideas into real websites, creating responsive layouts, adding animations, connecting CMS content, setting up SEO, and publishing the final website. Figma and Framer are not competing tools, they work together for designing and launching websites. You can check out our Framer vs Figma comparison, which says Figma is best for structured design work, while Framer is best for fast website execution.
But you must know that Figma to Framer is not about importing the design and publishing the website right away. Importing is the starting point, you need to a lot of things after that for the final interactive live website.
How the Figma to Framer Workflow Works?
The Figma to Framer workflow has three main stages: prepare, import, and rebuild for launch.
Before You Import Prepare Your Figma File
Before importing your design file from Figma to Framer, you have to clean the Figma file, this is a very crucial stage. A clean Figma file is very easy to import, edit, and turn into a responsive Framer website. It's better to clean things first because later messy layers, hidden experiments, random groups, fixed spacing, and oversized assets creates layout problems after import. The better your Figma file structure is, the less manual cleanup you will need later.
Clean the Final Design Frame
Start by cleaning the exact frame you want to import, keep the final version and remove things that belong on the live website. Deleted any unused sections, layout experiments, hidden layers, any duplicate content or design notes, so imported design should be organized and focused.
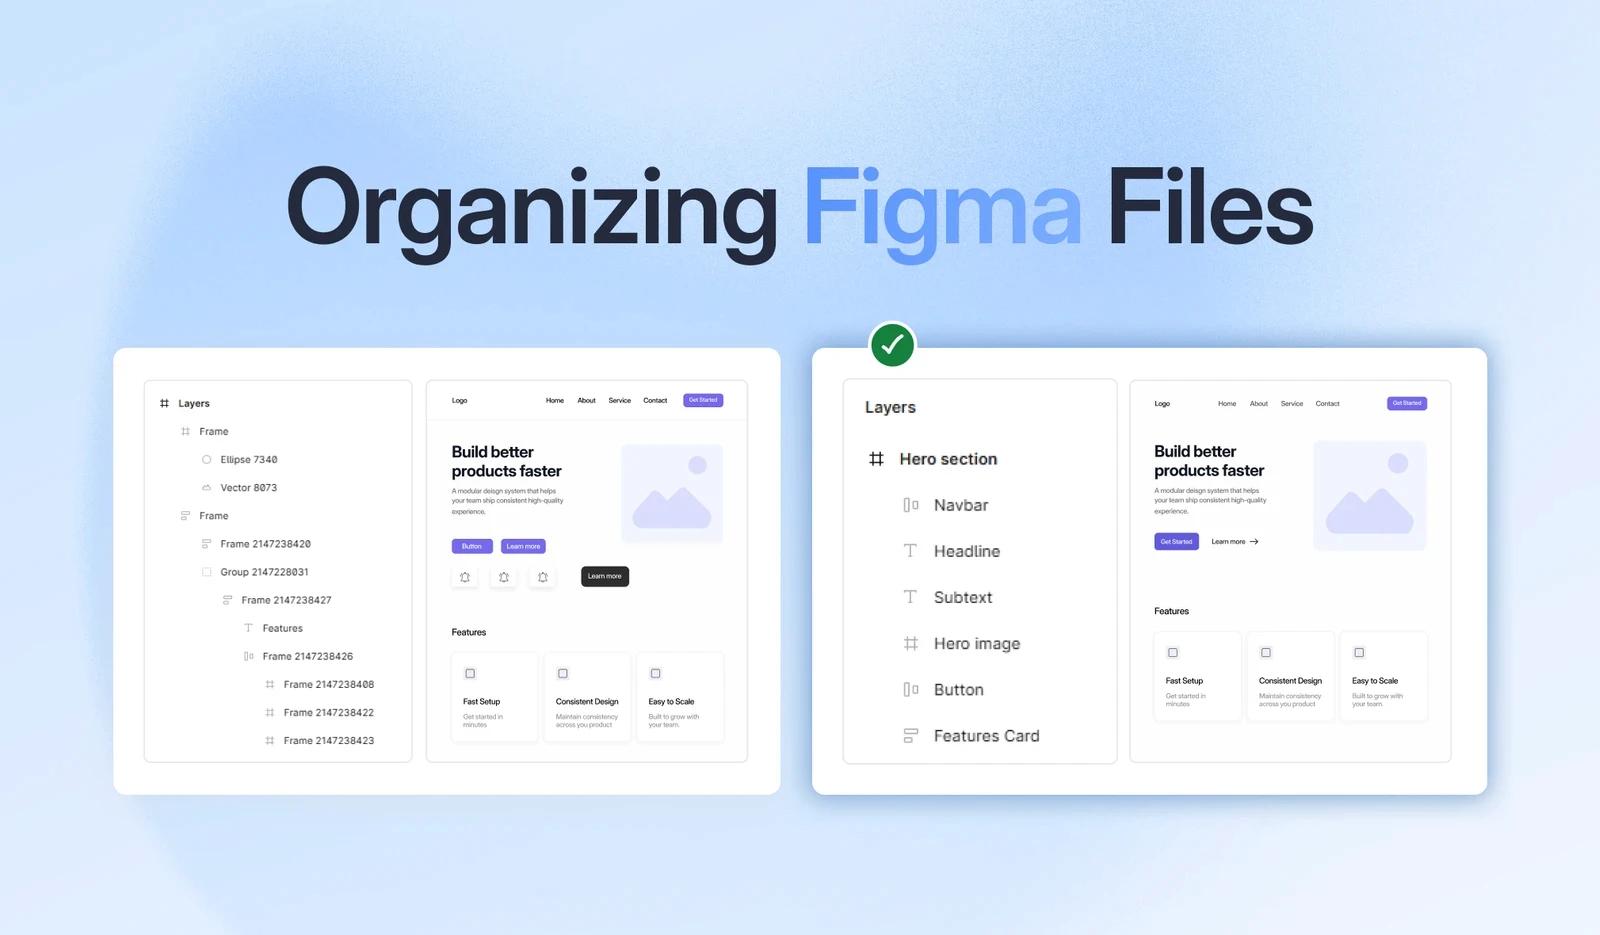
Name Sections and Layers Clearly
You must know that right naming makes the cleanup process easier, don't name things randomly like, “Frame 127,” name it way you name sections in website. For example, hero, features, benefits, about, testimonials, price, footer, and etc. It is said because when the sections and layers are named in Figma, it will become easy for you to find, adjust and rebuild in Framer.
Use Auto Layout Where Possible
The auto layout option will help your Figma design to behave like a real website layout, keeping space, alignment, and content structure more consistent. You can use auto layout for the elements like buttons, navigation items, cards, feature lists, pricing tables, testimonial blocks, forms, and footer columns.
Structure the Design Like a Real Website
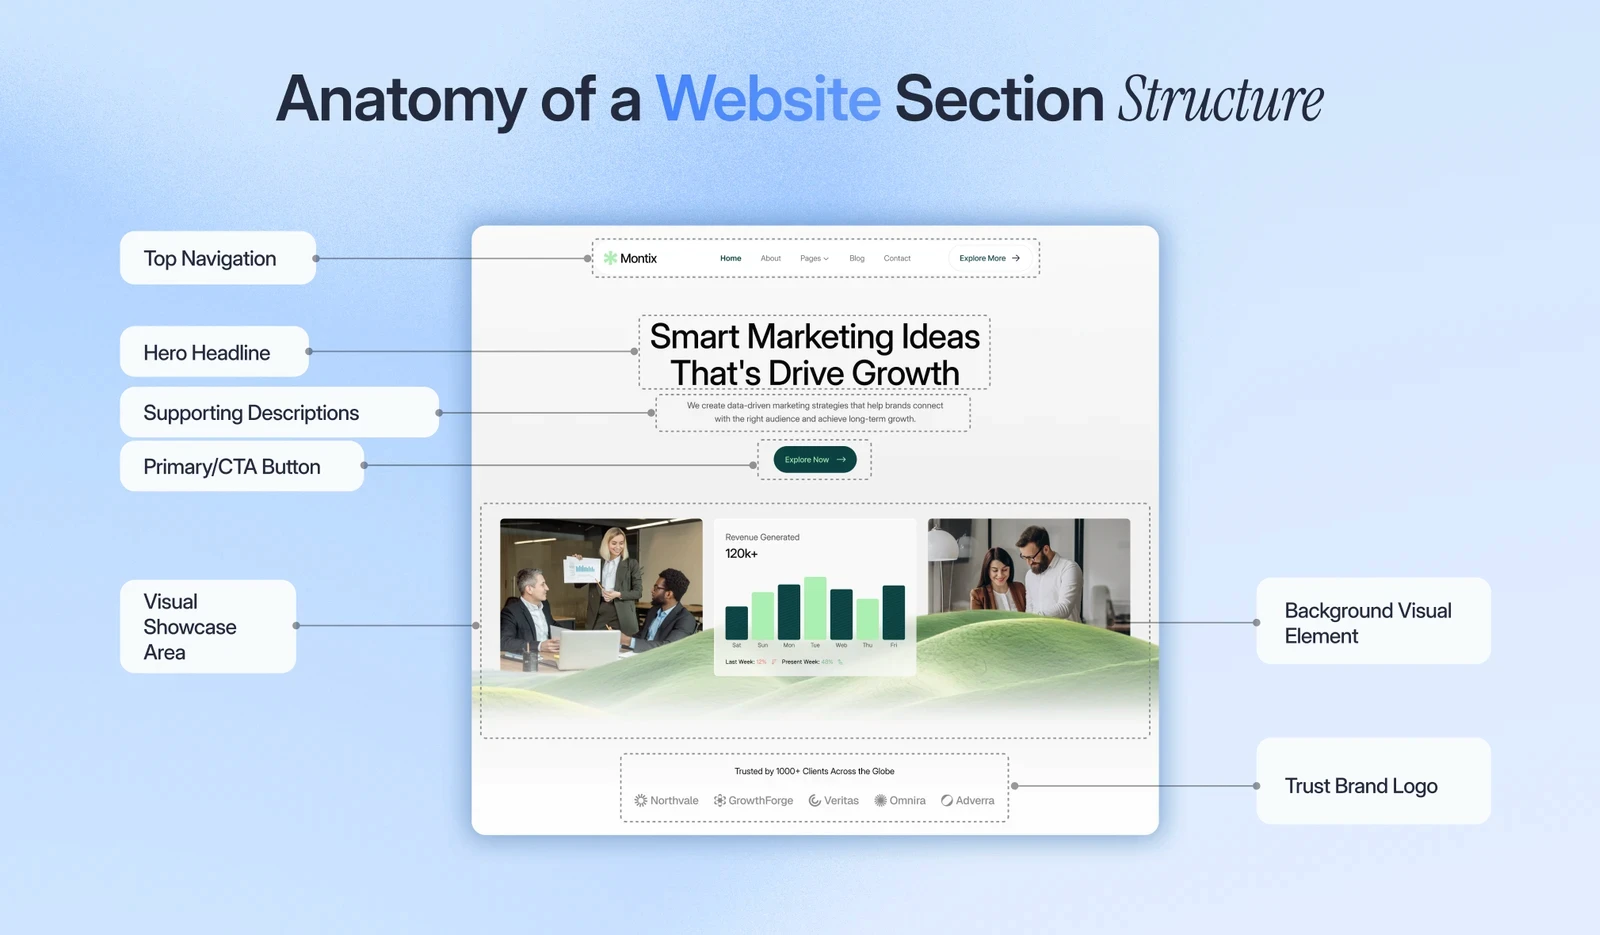
Don't do the mistake of designing a Figma file like a poster, as it may become difficult to rebuild responsively in Framer. Structure each page section with a proper website hierarchy for example section, container, content wrapper, text group, CTA group and image or media frame.
In the process of Figma to Framer, the structure matters same as the visual designs, as a design might become problematic to rebuild for poor structure.
Prepare Images, Icons, and Fonts
Things to remember before importing from Figma to Framer:
large images might slow down the website
messy icons might create alignment issues
missing fonts can change appearance of your website
So, you have to compress the large images before using them in the website, use SVG files for the icons so they are sharp in all devices. And also check that the fonts you used in Figma, are available in Framer so that you don't face any mishap later.
How to Import Figma to Framer Step by Step?
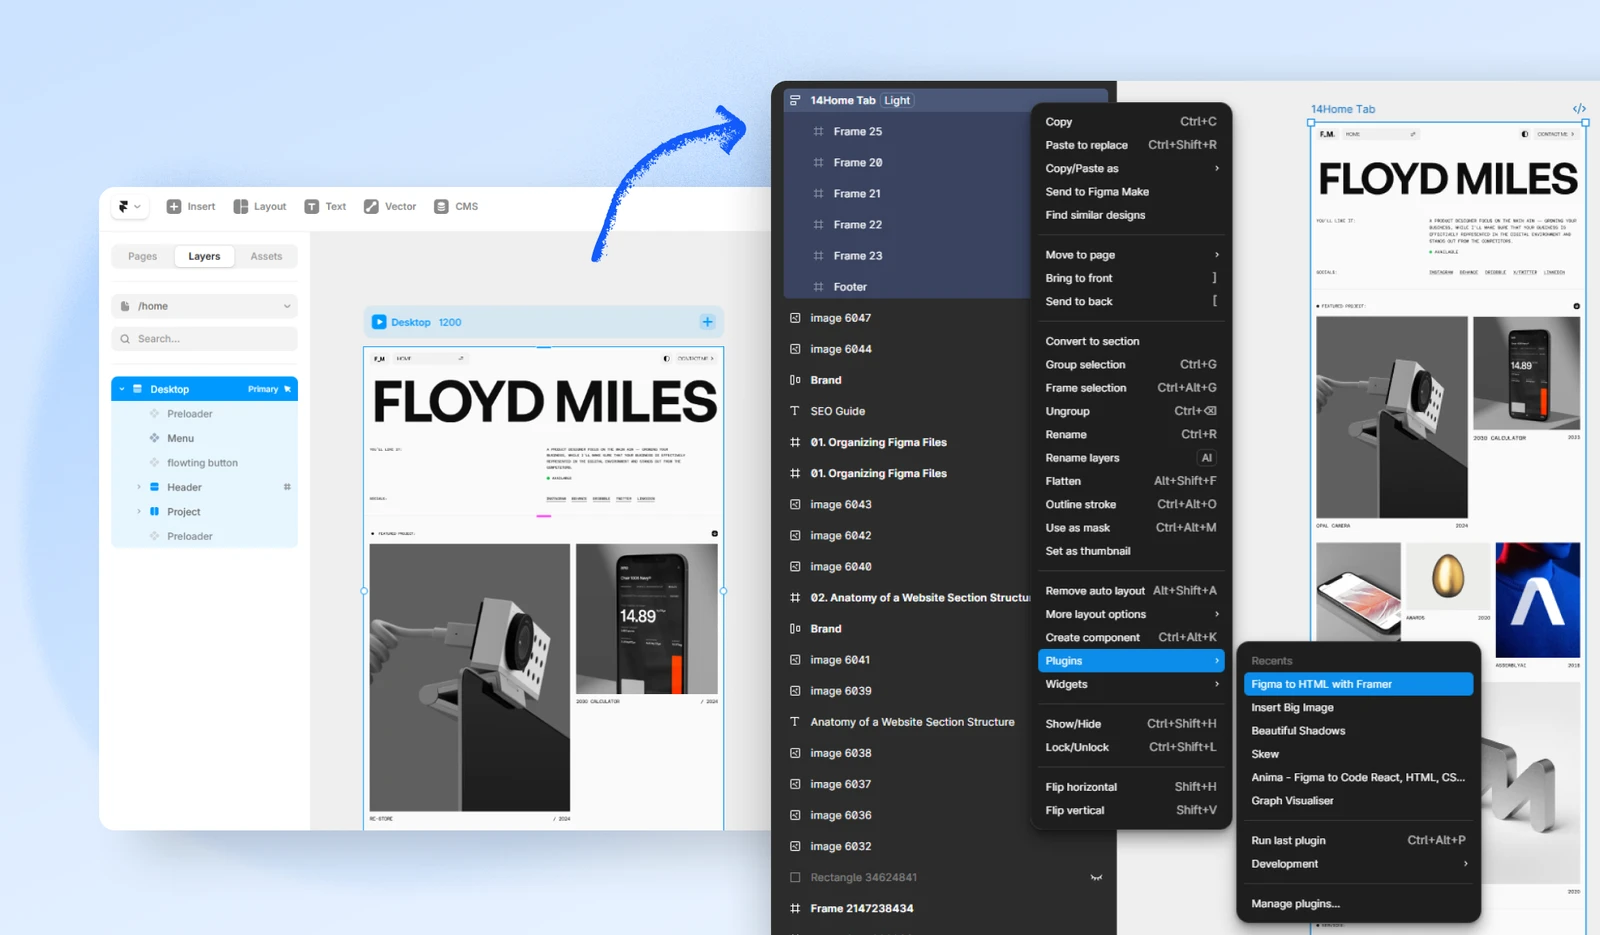
Only one plugin is needed to import a Figma design into Framer website, that's the Figma to HTML with Framer plugin. Through this plugin you can select layers or frames in Figma, then copy and paste them directly into Framer project. Due to this Figma to HTML with Framer plugin you don't have to manually export all layers, icons, images and text blocks from Figma.
Step 1: Install the Framer Plugin in Figma
First, install the official Figma to HTML with Framer plugin inside Figma. Then open the Figma file, copy the selected part which is clean, organized and structured with proper frames and auto layout.
Step 2: Select the Section or Frame You Want to Import
For a few projects, it's better to import section by section and not copying the entire page fully. Example, you can start with the Navigation bar, hero, then features and continue section by section. Due to this approach, you get more control to review each section, fix layout issues, find problems, and keep the work professional.
Step 3: Copy the Selected Design from Figma
Once you are done selecting the section, run the plugin, so in this copying step, the Figma design gets converted into a format Framer can accept it.
Step 4: Paste Into Your Framer Project
After copying it, go to the project in Framer where you will add the design, and paste the copied section. Once it is pasted, review the output instantly before importing everything.
Check whether the section looks close to the original Figma design. It does not need to be perfect at this stage, but the basic layout, text, images, and spacing should come through clearly.
Step 5: Review the Imported Layers
After pasting the section into Framer, inspect the imported structure carefully, such as:
Layer hierarchy
Text styles
Font size and line height
Image fills and cropping
Width and height settings
Section spacing
Grouping structure
Component behavior
Desktop, tablet, and mobile layout
You need to review the steps because imported Figma design might look visually close first, but then have to cleanup layout. After you are done importing it, you have to fix layout settings, convert static groups into stacks, rebuild important components, create responsive breakpoints, and more.
Post-Import Cleanup in Framer
After importing it, you have to turn it into a flexible, responsive and interactive Framer website. You can start by checking the width and height settings of each section, container, text block, image and cards. Then convert the static groups into stacks, as it will help you control spacing, alignment, and more. Then you might notice that imported design includes repeated elements, so you have to rebuild them as Framer components.
Components make your Framer website easier to manage. Instead of editing the same button or card style again and again, you can update the main component and keep the design consistent across the page or website. For example, if your design has the same CTA button in the hero, pricing section, and footer, that button should not be treated as three completely separate objects. Rebuilding it as a component gives you better control over styling, hover states, responsiveness, and future updates.
FAQ
Does Framer export my Figma design as HTML, CSS, and JavaScript?
Framer turns your Figma design into a live website, but it does not work like a traditional HTML, CSS, and JavaScript export tool. Framer generates and hosts the website inside its own platform, with responsive layouts, interactions, and publishing tools included.
Why does my Figma layout break after importing into Framer?
This usually happens because of fixed positioning, messy groups, weak Auto Layout structure, or importing the full page at once. To fix it, import section by section, check width settings, convert static groups into stacks, and rebuild messy sections directly in Framer when needed.
How do I make an imported Figma design responsive in Framer?
You have to review every breakpoint manually, like start with desktop, then adjust tablet and mobile layouts. Convert multi-column sections into stacked layouts, use Fill or relative sizing where needed, adjust typography, fix image behavior, and test buttons, menus, and forms on smaller screens.
Final Words
Figma to Framer is much more than a import process, it's a complete design to launch workflow. You know by now that Figma helps you to plan the structure, design and then Framer helps to turn design and publish the website. The best results come when you prepare your Figma file properly, clean layout, rebuild, optimize, and test before publishing.

Tarik Eamin
CEO @ Whiteframe Creative
I’m on a mission to build premium, production-ready design systems that help products look sharp and ship faster. At GrabUI, we share thoughtfully built templates, sections, wireframes, UI elements, icons, branding assets, and motion templates designed for real-world products, not just showcase screens. Through practical blog resources, we help you make better design decisions not just prettier screens.
Pro+
Upgrade to Grabui
Discover unlimited inspiration to help you Design fast. Build faster.
9000+ sections
Websites in minutes
Elements and icons
Complete design toolbox
Instant copy & paste
Works with your platform
Share this article on


